
Efekt dymu z gimpem - jak to działa
W Gimp możesz tworzyć imponujące efekty dymu i pozwolić, aby na zdjęciach pojawiał się dym i para. Instrukcje i galerię zdjęć można znaleźć tutaj.
Gimp: Twórz efekty dymu z filtrem IWarp
- Otwórz Gimp i użyj „Plik”, aby utworzyć nowy dokument, który jest mniej więcej wielkości kolumny dymu - nieco więcej niż dwa razy większej. Następnie wypełnij tło białą farbą. W ten sposób lepiej rozpoznasz dym później, gdy nad nim pracujesz.
- Teraz dodaj nową warstwę w menu warstw za pomocą „Nowa warstwa ...”, wybierz „Przezroczystość” jako typ wypełnienia warstwy w oknie dialogowym i kliknij „OK”.
- Ustaw kolor ciemnoszary jako kolor pierwszego planu i narysuj grubą, pionową linię za pomocą narzędzia pędzla. Następnie użyj jaśniejszego odcienia szarości i mniejszego promienia pędzla, aby narysować drugie pociągnięcie (mniej więcej w połowie pierwszego). Nie jest ważne, abyś pracował bardzo precyzyjnie, pociągnięcia mogą łatwo zostać krzywe i krzywe.
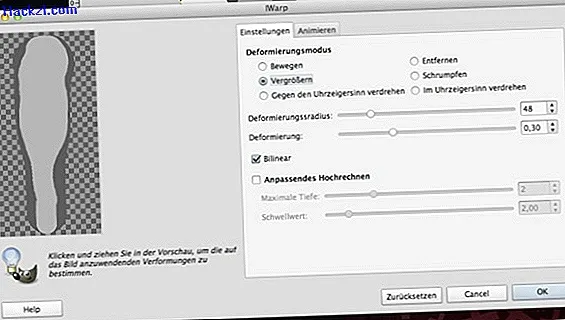
- Teraz otwórz filtr „IWarp”, który znajdziesz w menu „Filtry” pod „Filtrami zniekształceń”. Wybierz tryb deformacji „Powiększenie” i promień deformacji około 30 do 60.
- Teraz przejdź do okna podglądu, naciskając przycisk myszy od środka pociągnięcia do jego górnej krawędzi. Powtórz ten proces, jeśli to konieczne, jeden lub dwa razy, aż twoja linia będzie znacznie grubsza w górnej połowie niż w dolnej połowie.
- Teraz przełącz tryb deformacji na „Zmniejsz” i poruszaj się w oknie podglądu przyciskiem myszy wciśniętym od środka pociągnięcia. Gdy wynik będzie satysfakcjonujący, kliknij „OK”.
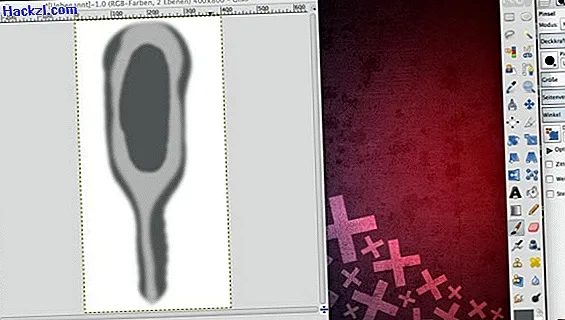
- Użyj rozmycia gaussowskiego, aby rozmyć obraz o promieniu około 10 do 20 pikseli. „Rozmycie gaussowskie” znajdziesz w menu „Filtr” pod „Rozmycie”.
- Następnie za pomocą kroplomierza wybierz ciemniejszy odcień szarości z obrazu jako kolor pierwszego planu i narysuj za pomocą pędzla owal w górnej części obrysu. Ponownie nie jest ważne, abyś pracował szczególnie precyzyjnie.
- W menu „Filtr” kliknij „Powtórz rozmycie gaussowskie”, aby ponownie zmiękczyć obraz z ustawionymi wcześniej wartościami.
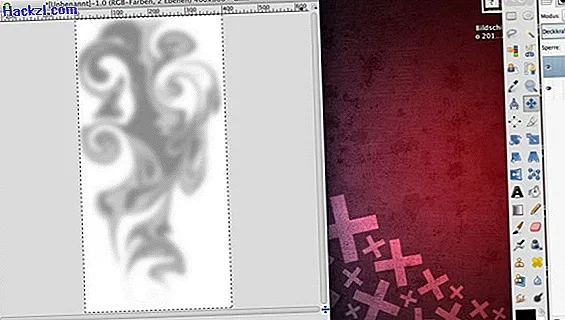
- Ponownie otwórz filtr „IWarp”, ale tym razem jako tryb deformacji wybierz „Obróć przeciwnie do ruchu wskazówek zegara”. Przytrzymaj przycisk myszy w oknie podglądu i kilkakrotnie przesuwaj pociągnięcie w górę i w dół, aż wiry będą przypominać chmurę dymu. Następnie kliknij „OK”.
- Teraz ponownie zastosuj rozmycie gaussowskie, ustawiając promień od 20 do 30 pikseli.
- Teraz możesz skopiować warstwę, na której znajduje się dym i wkleić go do innego obrazu. Wszystko wygląda jeszcze bardziej realistycznie, jeśli zmniejszysz trochę krycie warstwy dymem w nowym dokumencie. Poszczególne kroki możesz ponownie przeczytać w naszej galerii zdjęć.

Dowiedz się, jak stworzyć świecące, gwiaździste niebo z Gimpem w tym praktycznym poradniku.
Najnowsze filmy
Utwórz przezroczystą warstwę na białym tle.

Narysuj dwie pionowe linie o różnej grubości, używając różnych odcieni szarości.

Użyj filtra IWarp w trybie deformacji „powiększ” i „zmniejsz”, aby zdefiniować szorstki kontur chmury dymu.
Edytuj wynik pośredni za pomocą rozmycia Gaussa.

Narysuj ciemnoszary owal u góry pociągnięć i ponownie zastosuj rozmycie gaussowskie.
Użyj filtra IWarp, aby wstawić zawirowania w trybie deformacji „przeciwnie do ruchu wskazówek zegara”.

Na koniec zmiękcz swój dym ponownie.
Jeśli chcesz wkleić chmurę dymu do innego obrazu, nieznacznie zmniejsz krycie warstwy zawierającej dym.
